Visualization of database sessions 1, 2, 3, and latch waits connecting to a central TEMPDB node
SQL Server 0

Usage of Tempdb and Tempdb Contention

SQL Server has few system databases which was used to store the medata and information related to SQL server which will require to function the SQL server smoothly. Tempdb is one of the important System database.

What is Tempdb?

Tempdb is a system database. It is used to store the temporary objects and intermediate results which created at the time of query executions.

When SQL services stops tempdb gets cleared and when SQL services starts again tempdb always starts as a clean copy.

Best practices for Tempdb

  1. Always keep tempdb on fast and dedicated storage.
    Ex. On Azure IaaS server there is drive called as Temporary storage, it is fast dedicated. we can use that drive for tempdb.
  2. Use multiple same size dta files to reduce allocation contention.
    Ex. 1 file per CPU core upto 8 files.
  3. Pre-size data and log files to avoid frequent autogrowth. Also, keep autogrowth increaments resonable.
    Ex. 512 MB for data files and 256 MB for log files.
  4. All databases on the same instance share or use same Tempdb.

Basic but important points about Tempdb

  1. Tempdb database is minimally logged.
  2. we can not backup tempdb database.
  3. If tempdb gets full, queries starts failing or slowdown drastically.

Usage of Tempdb

Tempdb is used to store the user created temporary objects like local temp tables #temp and global temp tables ##temp, table-valued variables and temporary stored procedures.
It is used to perform operations like sorts, hashes, spools, worktables and intermediate result sets when an operation can not fit in a memory.
Data related row versions for features like Read-Committed Snapshot Isolation, Snapshot Isolation, online index rebuilds, MARS and some triggers.
Also, it acts as a temporary storage for certain metadata structures, cursors and some internal objects.

What if Tempdb is getting full?

  1. Check why tempdb is not able to grow.
    – Confirm that the tempdb files have autogrowth turned ON.
    – Check and confirm that disks are not full and files are not hitting their maxsize.
    If disks are full, add some space or pre-grow tempdb data and log files to safe size.

2. Identify the queries and sessions which are burning the tempdb space.

3. Take action on culprit.
– If you get long running or runaway query, reconsider killing it carefully.
– If maintainancr job or any other job is the cause, reschedule it outside of peak hours.

4. Once the cause is resolved shrink the tempdb files.

5. If there is emergency then restart the SQL services.

What is Tempdb Contention?

In SQL Server Tempdb contention occurs when multiple sessions and queries complete for access to shared allocation pages like PFS, GAM and SGAM causing latch waits and performance bottlenecks.

When you execute DMV like sys.dm_exec_requests you will see high waits on PAGEIOLATCH_*, PAGELATCH_* or LATCH_*. This occurs especially during heavy temp table or sort operations. Queries slow down under concurrency.

Below are the types of Contention

Allocation Contention

Sessions queue for PFS, GAM, SGAM pages during object creation in tempdb data files.

Metadata Contention

Overloaded access to tempdb system tables(Ex.sys.objects) from many temp table creations.

Solution to Tempdb Contention issue

Add multiple equally sized tempdb data files(1 per logical CPU upto 8, then in multiples of 4) to spread load via round robbin allocation.
For SQL server 2019 and above versions, enable memory optimized tempdb metadata to eliminate metadata issues.

Solution for Tempdb Contention issue

Check all related blogs

SQL Server 0

SQL Server ACID Properties

What is ACID Properties in SQL?

These Properties are important aspects of whole Database Management System.

Many application uses MS SQL server for their databases. Number of complex queries runs on the database, many a times multiple queries were running on the databases. But we never heard that, SQL server has any type of issue in the data due to this.

You know how SQL server is achieving this?

SQL Server ensures the transaction reliability by enforcing Atomicity, Consistency, Isolation, and Durability through the storage engines Transaction Manager.
These Properties of SQL server are called as ACID property.

Atomicity

Whenever we execute any transaction, it will execute fully or fails completely. If the transaction fails partially, SQL server triggers the ROLLBACK.

  • There is no partial execution
  • This property prevents partial data updates
  • Maintains data integrity
  • SQL servers uses below commands to achieve this
    BEGIN TRANSACTION,
    COMMIT,
    ROLLBACK

Technically SQL server uses Transaction Logs and Write-Ahead logging mechanisms to achieve Atomicity.

Example:-

Bank transfer from Account A to Account B:

  • Step 1: Debit 100 from A (UPDATE AccountA SET Balance = Balance – 100).
  • Step 2: Credit 100 to B (UPDATE AccountB SET Balance = Balance + 100).

With Atomicity, you never end up with A debited but B not credited.
Either both updates succeed, or both are undone.

Consistency

This property ensures that a transaction brings the database from one valid state to another. It preserves all defined rules like constraints, triggers, and relationships.

After a transaction

  • All rules, constraints, and relationships must be satisfied
  • Invalid data is not allowed

SQL server enforces consistency using following-

1. Constraints
Primary Key – no duplicates, no Nulls
Foreign key – valid relationship
UNIQE- No duplicate values
CHECK – validate conditions
Not Null – prevent missing value

2. Triggers
Automatically enforce business rule

3. Data Types
Ensures correct format

4. Indexes and relationships
Maintain logical integrity between tables

Atomicity handles completions, where consistency handles correctness.

Isolation

This property of SQL server controls how transactions interact with each other when running concurrently

It ensures that one transaction does not interfere with another transaction’s data

This prevents dirty reads, non-repeatable reads and phantom reads Default Isolation level in SQL server is READ COMMITTED.

Durability

This property ensures that once the transaction commits, its changes are permanently saved. These changes survive system failures like power outages, crashes, or restarts.

When you execute the transactions in SQL server, data is written to transaction logs.

When you Commit, SQL server forces transaction log records to disk.

Once the data flushes to the disk, it becomes durable

Please refer below Microsoft article for more information

ACID Properties

Check all related articles

System database 0

Resource Database

Till now you are aware about the 4 main system databases. However, there is one more important, but hidden system database is exists. Yes, it is called as Resource Database or mssqlsystemesource database.

Today, we will explore this hidden database in SQL Server.

  • This is hidden and read only system database.
  • It does not contain user data or user metadata.
  • It contains all the system objects that are included with SQL Server.
  • SQL Server system objects like sys.objects are resides in this database, however, they logically appear in the sys schema of all the databases

Physical Properties of Resource Database

  • Below are the physical file names of the resource database
    • mssqlsystemresource.mdf
    • mssqlsystemresource.ldf
  • Below is the location of these files.
    <drive>;\Program Files\Microsoft SQL Server\MSSQL<version>.<instance_name>\MSSQL\Binn\
  • Each instance has only one associated mssqlsystemresource.mdf file.
  • Changing the location of resource database files is not at all recommended.
  • The Id of this Database is always 32767.
  • Other important values associated with this database are as below
    • Version Number
      SELECT SERVERPROPERTY('ResourceVersion');
      GO
    • Last time the database was updated
      SELECT SERVERPROPERTY('ResourceLastUpdateDateTime');
      GO

Backup and Restore of Resource Database

  • We can not backup this database using SQL server like other system or user databases.
  • If you want to backup, you can take the backup of the resource database files directly like file backup.

Please check below Microsoft article for further information.

Resource Database

Check all related articles

SQL Server AlwaysOn 1

Availability Group Listener: Benefits and Configurations

What is Listener?

An Availability Group Listener is a Virtual Network Name (VNN). Clients can connect to this VNN to access the database in a primary replica. They can also connect to a secondary replica of an Always on Availability Group.
Listener allows application to connect to the replica without knowing physical name of instance of SQL server.

Only TCP protocol is supported by availability group listener

When an availability group failover occurs, the listener terminates its connection with the affected instance. It then establishes a connection with the new primary instance. Because of this we do not need to make any changes on application side after failover.

Read only routing can be set up for one or more readable secondary replicas. In this setup, read-intent client connections to the listener are redirected automatically. They are directed to a readable secondary replica.

Listener Parameters

A) A unique DNS Name

This is also known as Virtual Network Name(VNN).
Active Directory naming rules for DNS host name are applied here.

B) Virtual IP Addresses

Listener can have one or more virtual IP addresses.
These IP addresses are configured for one or more subnets to which the availability group can failover.

C) IP Address Configuration

We can use dynamic IP address but as per recommendations you should use static IP address.
If the Availability groups that extends to multiple subnets must use Static IP addresses.

D) Listener Port

If you use default port 1433 for listener you can directly connect to AG using listener name.
If you are using a port other than 1433, you must mention the port number. You need to include it with the listener name explicitly in the connection string.

You can use below views to perform checks on availability group listener.
1. sys.availability_group_listener_ip_addresses
2. sys.availability_group_listeners
3. sys.dm_tcp_listener_states

Check all related articles

SQL Server Architecture 0

Understanding SQL Server Buffer Cache: PLE & Hit Ratio Explained

SQL Server has excellent feature called Buffer cache or Buffer pool. The buffer manager copies data into memory whenever it is written to or read from the SQL Server database. Because of this, SQL server can read or write data very fast. You can also say that this improves the performance of the SQL server.
Page Life Expectancy (PLE) and Buffer Cache Hit Ratio are performance counters. They are related to the time spent by data pages in this buffer pool.

Page Life Expectancy (PLE) in SQL Server

Page Life Expectancy is the number of seconds a page will stay in the buffer pool without references.
In simple words, if your page stays longer in the buffer pool, your Page Life Expectancy is high. This leads to high performance. Every time a request comes, it is more common to find its data in the cache. This prevents going again and again to the hard drive to read the data.

  • Page Life Expectancy measures in seconds.
  • Page Life Expectancy is one of the important performance counter of SQL Server.
  • Higher the Page Life Expectancy, better the performance of SQL Server.
  • As per the Microsoft’s recommendation, value of Page Life Expectancy counter is around 300 seconds.

You can check the Page Life Expectancy value for your SQL server using below Dynamic Management View (DMV).

SELECT object_name, counter_name, cntr_value from sys.dm_os_performance_counters WHERE [object_name] LIKE '%Buffer Manger%' AND [counter_name] = 'page life expectancy'

Buffer Cache Hit Ratio

Buffer Cache Hit Ratio shows the percentage of pages found in the buffer cache. These pages are found in the memory and there is no need to read it from the disk.
The ratio is calculated by dividing the total number of cache hits by the total number of cache lookups. This calculation is based on the last few thousand page accesses.

  • Buffer Cache Hit Ratio is one of the important performance counter of SQL server.
  • You can increase the buffer cache hit ratio in two ways.
    1. One is by increasing the amount of memory available to SQL Server.
    2. The other is by using the buffer pool extension feature.

You can check the Buffer Cache Hit Ration value for your SQL server using below Dynamic Management View(DMV).

SELECT object_name, counter_name, cntr_value from sys.dm_os_performance_counters WHERE [object_name] LIKE '%Buffer Manger%' AND [counter_name] = 'Buffer cache hit ratio'

Check all related articles

SQL Server Architecture 1

Page, Extent in SQL Server

Page in SQL Server

Page is fundamental unit of data storage in SQL Server.
The disk space allocated to data files in database is logically divided into pages. Disk I/O operations are performed at the page level. Which means SQL server read or writes the whole data page.
All the pages are same physical size i.e. 8 KB.
Some pages includes data, metadata or both.
Each Page begins with the 96-byte header which includes system information about the page. It includes the page number and page type. It also covers the amount of free space on the page. Additionally, it includes the allocation unit ID of the object that owns the page.

Note – Log files do not contain pages, they contain a series of log records.

Types of Pages

  1. Data Pages
  2. Index Pages
  3. Text/Image Pages
  4. Global Allocation Map(GAM)
  5. Shared Global Allocation Map(SGAM)
  6. Page Free Space(PFS)
  7. Index Allocation Map(IAM)
  8. Bulk Changed Map(BCM)
  9. Differential Changed Map(DCM)

1. Data Pages
Data pages contain data rows with all the data. This excludes text, ntext, image, nvarchar(max), varchar(max), varbinary(max), and xml data when text in row is set to ON.

2. Index Pages
Index pages includes index entries.

3. Text/Image pages
It includes data with large object types. These include text, ntext, and image. Other types are nvarchar(max), varchar(max), varbinary(max), and xml data.

4. Global Allocation Map (GAM)
GAM page includes information related to Extent allocation.
GAM has a bit for every extent. If the bit is 1, the corresponding extent is free. If the bit is 0, the corresponding extent is in use as uniform or mixed extent.
A GAM can hold information of 64000 extents.

5. Shared Global Allocation Map (SGAM)
SGAM pages record which extents are currently being used as mixed extent. They also have at least one unused page.
If the bit is 1, the corresponding extent is used as mixed extent. It also has at least one page free to allocate. If the bit is 0, the corresponding extent is not used as mixed extent. Alternatively, it is a mixed extent with all its pages being used.
A SGAM page also holds information of 64000 extents.

6. Page Free Space (PFS)
PFS pages includes information about page allocation and free space available on pages.

7. Index Allocation Maps (IAP)
IAP pages includes information about extents used by a table or index per allocation unit.

8. Bulk Changed Map (BCM)
BCM pages contain information about extents. These extents are modified by bulk operations after the last BACKUP LOG statement.

9. Differential Changed Map (DCM)
DCM pages contain information about extents. These extents have been changed since the last BACKUP database statement.

Extent in SQL Server

Extent is a collection of eight physically contiguous pages, which means size of extent is 64 KB.
Extent helps to manage pages efficiently.
SQL Server uses GAM and SGAM pages to manage extent allocation.
BCM and DCM pages are used by SQL server to track the modifications in extents.

Types of Extents

1. Uniform Extent
Uniform extents are owned by a single object. Means all the eight pages in the extent are used by same object.

2. Mixed Extent
Mixed extents are owned by different objects. Each of the eight pages can be used by different objects.

Types of Extent
Types of Extent

Check all related articles

SQL Server Availability groups 1

Patching of SQL Servers in Availability Group

Nowadays, this is the common question that, “How to perform the patching of SQL Servers in Availability group?” or “What are the steps we should follow while patching Availability replica?

The SQL Server AlwaysOn Availability group consists of multiple instances with one primary and multiple secondary replicas.
You are aware that SQL services on these instances/servers are always in a running state. Data continuously flows back and forth on these instances. Such situation makes patching servers complex.

Patching of servers in an Availability group is completely different than the patching of servers in SQL Server Failover Cluster.

Let us see steps to patch SQL servers in AlwaysOn Configuration.

  • Download the security updates or cumulative updates from the below official Microsoft’s site.
    Microsoft Update Catalogue
  • First of all we should take a good backup of Servers and the databases residing on those servers. If possible taking VM Snapshot before the activity is a good option in such scenarios.
  • Generally, we use one secondary replica with “Synchronous commit mode with Automatic Failover” option. Another secondary replica uses “Asynchronous Commit mode with Manual Failover”. Keep in mind that we need to change the failover mode of both the replicas to “Manual Failover”.
Change Failover Mode from Automatic to Manual for all availability replica
  • If the availability mode of a replica is “synchronous commit”, SQL Server waits for transactions to apply on the secondary server. Then, it commits on the primary server.
  • If for any reason the secondary server is not available, it will start increasing the size of transaction logs. This will start creating further issues.
  • To avoid this we should change the availability mode of replicas to “asynchronous commit”. so that SQL server will not wait for the transactions to be applied on secondary servers.
Availability Replica with Asynchronous commit mode
  • Now go to secondary server and apply service packs, cumulative patches or OS patches.
  • Make sure that all the patches are successful and the given secondary server has been rebooted as per requirement.
  • Once server comes online make sure to bring all SQL services up and running. Validate all the SQL services and databases are running as expected.
  • Check the SQL server error logs for any errors.
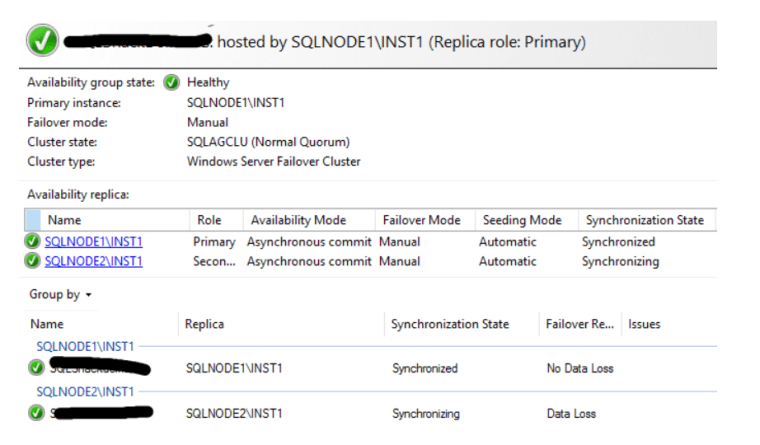
  • Now connect to database instance and go to Availability Group Dashboard and verify everything is healthy.
Example of Healthy Availability Group Dashboard
  • Now perform the manual failover from primary replica to the secondary replica.
  • After the failover existing primary replica becomes the secondary replica. Perform all above steps to patch new secondary server as well.
  • Once you finish the patching for this server check the SQL server versions of all the replicas.
  • Ensure that the patches you have installed are applied successfully on all the replicas. Verify that all the SQL servers are in the same configurations with the same Cumulative updates.
  • Now go to the properties of Availability group and change the failover mode and availability mode with the original settings.

Now you have successfully completed the patching of servers in Availability group.

Check all related articles

SQL Server 1

SQL Server Replication Types and Components

SQL Server Replication is a technique of copying and distributing data and database objects from one database to another. It then synchronizes between databases to maintain the consistency and integrity of data.
In Replication data is synchronizing continuously or it can also schedule to run in fixed intervals.
There are multiple types of replication based on the several types of data synchronization they support.

1. Snapshot Replication
2. Transactional Replication
3. Merge Replication
4. Peer-to-peer Replication

Below are basic components of Replication

  1. Article
    An Article is the basic unit of Replication in SQL server. An article can be Table, View, Stored Procedure and function. We can create multiple articles on same object.

2. Publication
A publication is a logical collection of articles. It includes the article to be provided to subscriber. You can use below query to get more information on your publication.

EXEC sp_helppublications;

3. Publisher Database
The database holds a list of objects. These objects are designated as SQL Server replication articles and are known as a publication database.
The publisher can have one or more publications.
Each publisher defines a data propagation mechanism by creating several internal replication stored procedures.

4. Publisher
The publisher is the database instance which makes data available to other database instances using SQL server replication. The publisher can have multiple publications, each defines logical set of objects and data to replicate.

5. Distributor
The Distributor is the database that stores transactions from publisher and distributes those to subscriber. Sometimes Publisher instance also acts as distributor. However, in remote distributor scenario, Publisher and Distributor runs on different instances.
Basically, it collects data from Publisher and sends it to Subscriber.

6. Distribution databases
Distributor must have at least one Distribution database.
The Distribution database consists of article data, replication metadata, and data.
A remote Distributor can have multiple distribution databases. However, all publications defined on a single publisher must use the same distribution database.
To check details of Distribution database you can use below queries.

EXEC sp_helpdistributor;
EXEC sp_helpdistributiondb;
EXEC sp_helpdistpublisher;

7. Subscriber
Subscriber receives SQL server replication data from publisher. Subscriber can receive data from one or more publishers. The subscriber can pass the database changes back to the publisher. Alternatively, they can republish the data to other subscribers. This depends on the replication type and design.
To check details of subscriber you can use below query.

EXEC sp_helpsubscriberinfo;

8. Subscriptions
A subscription is request for a copy of a publication to be delivered to a subscriber. The subscription defines what publication data will be received, where and when.
There are two types of subscription

  1. Push Subscription – Distributor directly updates the data in the Subscriber database.
  2. Pull Subscription – the subscriber is scheduled to check at the distributor regularly. They determine if any new changes are available. Then, they update the data in the subscription database.

To check details of subscription you can use below query.

EXEC sp_helpsubscription;

9. Replication Agents
Replication uses a number of standalone programs. These programs are called agents. They carry out the tasks associated with tracking changes and distributing data. By default, replication agents run as jobs scheduled under SQL Server Agent. SQL Server Agent must be running for the jobs to run.
Replication agents can also be run from the command line and by applications that use Replication Management Objects(RMO).
Replication agents can be administered from SQL Server Replication Monitor and SQL Server Management Studio.

10. Snapshot Agent
The snapshot agent prepares the schema and initial data files of published tables and other objects. It takes a snapshot, stores the snapshot files, and records information about synchronization in the distribution database.
Snapshot Agent runs at distributor.
It is typically used in all types of replication.

11. Log Reader Agent
The Log Reader Agent is used with Transactional replication. It moves transactions from the transaction log on the Publisher to the distribution database.
Each database in transactional replication has its own Log Reader Agent. This agent runs on the Distributor. It connects to the Publisher.

12. Distribution Agent
The Distribution agent is used with Snapshot replication and transactional replication. It applies initial snapshot to the subscriber and moves transactions from the distribution database to subscribers.
For push subscriptions Distribution Agent runs at the Distributor.
For pull subscriptions Distribution Agent runs at the Subscriber.

13. Merge Agent
The Merge agent is used with merge replication. It applies the initial snapshot to the subscriber and reconciles the incremental data changes that occur at both ends.
By default, the Merge Agent uploads changes from the subscriber to the publisher. It then downloads the changes from the Publisher to the Subscriber.

Check all related articles

log Shipping block diagram
Disaster Recovery 0

Log Shipping

Log shipping is the process of automatically backing up the transaction logs on a primary database server. Then those logs are restored on to the standby server.

This technique provides the disaster recovery solution for a single primary database. It also provides it for one or more secondary databases. Each database resides on a separate instance of SQL server.

During the interval between restore jobs, we can access secondary databases for read only purpose.

  • For log shipping the recovery model of the database must be full or bulk logged.
  • Collation must be same.
  • We cannot take the backup of secondary database.
  • It does not support automatic failure.
log Shipping block diagram

Log Shipping Involves below steps

  1. Backup Job – Backup the transaction log file on the primary SQL Server Instance or any backup share.
  2. Copy Job – Copy the transaction log backup file across the network to one or more Secondary SQL server instances
  3. Restore Job – Restore the copied transaction logs on the secondary SQL server instances.

Primary Server

The instance of SQL Server, which is your production server is called as the primary server.

Primary Database

The database on the primary server which you want to backup to another server is called as the primary database.
All the administrative activities are performed from the primary database with the help of SQL Server management studio.

Secondary Database

The worm standby copy of the primary database is called as secondary database.
The secondary database can be in below two states

  1. Recovering
  2. Standby

Monitor server

Monitor Server tracks all the details of this process. It includes below things

  • Keep the information about when the transaction log on the primary database was last backed up.
  • When the secondary server last copied and restored the backup files.
  • Information about any backup failure alert.

Monitor server is an optional.
Note – We cannot make any changes in the monitor server configuration without breaking or removing log shipping configuration.

Operating Modes

There are two operating modes and they are based on the state in which the secondary database will be

  1. Standby mode – The database is available for querying and users can access it, but in read only mode. The database will not
    be available when restore process is running.
  2. Restore mode – The database is not at all accessible

TUF file

TUF stands for “Transaction Undo File”.
This file contains information about any changes. These changes are related to incomplete transactions at the time the backup was done.
It is required if a database is loaded in read state. In this state further transaction log backups may be applied.
It is created while performing log shipping to a server in standby mode.
If TUF file is corrupted or lost, log shipping will not work, and we need to setup it again.

WRK File

The WRK files are produced when the transaction log backups are copied from the backup location to a secondary server.
Once the copy operation completed successfully file automatically renamed to “.trn” file.
It ensures that the files are not picked up by restore job until it successfully copied.

Check all related articles

SQL Server Availability groups 2

SQL Server Availability Group in AlwaysOn

In earlier article we learn about the requirements/ prerequisite for SQL Server AlwaysOn Configuration”. Now lets see about the SQL Server Availability Group.

SQL Server Availability Group is an alternative to database mirroring.

In SQL Server, Availability Group is a collection or group of user databases which failover together. Databases participated in this are called as Availability Databases. In mirroring, replicas are limited to principle and mirror database. However, in availability group, it supports read-write primary databases. It also supports multiple secondary databases which are accessible for read-only operations.

Database failover is not related to individual database issue such as database file or transaction log file corruption. It is related to the issues at a SQL server instance level. Failover occurs on per replica basis and all the databases in the SQL server Availability group replica fail over.

Availability Modes

Availability Modes of SQL Server Availability Group depends on data loss and transaction latency requirements. There are two types of availability modes.

  1. Asynchronous-commit mode
  2. Synchronous-commit mode

Asynchronous-commit mode

In your SQL Server Availability Group, if replicas are placed at geographically dispersed locations, you must use Asynchronous-commit mode. When you configure a secondary replica with Asynchronous-commit mode, the primary does not wait for the secondaries to write log records to disk. It will run with minimum transaction latency.

If you configure the primary replica with Asynchronous-commit mode, then the transactions for all replicas will be committed asynchronously. This happens irrespective of the mode of each secondary replica.

Synchronous-commit Mode

In Synchronous-commit mode transaction latency is more, but it minimizes the chance of data loss when automatic failover happens. Each transaction is applied to secondary before being written to the local log file. The primary database always verifies that the transaction has been applied to the secondary. After that, it enters into the Synchronized state.

SQL Server Availability Groups Properties

Failover Modes

As we already discussed, in SQL Server Availability groups failover at availability replica level. When failover happens one of the secondary replica becomes a primary and original primary replica becomes secondary replica. SQL Server Availability groups supports three types of failover modes.

  1.  Automatic failover
  2. Planned manual failover
  3. Forced manual failover

Automatic Failover

Automatic failover occurs without manual intervention. There will be no data loss occurs during this type of failover. It is supported only if the current primary and at least one secondary replica are configured with automatic failover.

The most important point is automatic failover can occur only if the primary and secondary replica are in synchronous-commit mode.

Planned manual Failover

In planned manual failover, failover is triggered by the administrator. This type of failover is used in case of maintenance activities. There will be no data loss in this type of failover. To perform planned manual failover at least one of the secondary need to be in Synchronized state.

You can perform planned manual failover only if the primary and secondary replicas are in synchronous-commit mode.

Forced Manual failover

Forced Manual failover involves the possibility of data loss. Use this type of failover when none of the secondary replicas are in a synchronized state. You should also use it when the primary replica is unavailable.

If asynchronous-commit mode is used on the primary, then forced manual failover is used. The same applies if the only available replica uses asynchronous-commit mode.

Check all related articles

Disaster Recovery 2

Configure AlwaysOn: Windows & SQL Server Requirements

Nowadays, most suitable high availability and disaster recovery solution is AlwaysOn. It is a mixture of SQL Server Failover Cluster Instance and Database Mirroring. Here we are going to see requirements to configure AlwaysOn.

Requirements from Windows server side to Configure AlwaysOn:

  1. Ensure that the server is not a Domain Controller. Availability Group is not supported on Domain Controllers.
  2. Also make sure that each server participating in this configuration is running on Windows server 2012 or Later.
  3. Each server has to be the part of the Windows Server Failover Cluster (WSFC).
  4. For best performance use separate network adapter for AlwaysOn availability group.
  5. All the nodes must have sufficient disk space. As the primary database grows, their corresponding replica also grows by the same amount.
  6. To manage the Windows Server Faiolver Cluster, the user must have administrator access on each node of the cluster.
  7. The instances of SQL Server that hosts replicas for an Availability group resides on separate nodes of the same cluster.
  8. In all the nodes you need to use same SQL Server Service Account.
  9. You need to register the Service Principal Name (SPN) with Active Directory (AD). Do this on the SQL Server Service Account. This is required for the Virtual Network Name (VNN) of the availability group listener.
  10. Keep in mind that, if you change the SQL Server Service Account, you need to manually re-register the SPN.

Requirements from SQL Server side:

  1. All nodes of cluster need to have the same version of SQL Server.
  2. Also, you must use same SQL Server Collation for all the instances.
  3. Enable AlwaysOn feature on each server instance.
  4. Availability replicas must be hosted on different nodes of one Windows Server Failover Cluster (WSFC).
  5. Availability group name must be unique and length should not be more than 128 characters.
  6. Each Availability group supports one primary replica and up to 8 secondary replicas.
  7. Up to 3 replicas will run on Synchronous-Commit mode. This includes 1 primary and 2 secondary. Other replicas will run on Asynchronous-Commit mode.
  8. Do not use the Failover Cluster Manager to fail over availability groups. You need to use the SQL server management studio to do it.

Note:

  1. We can’t add System databases in availability group.
  2. We can’t add read only databases to Availability group.

To know more about the SQL server availability groups in AlwaysOn Configuration, please check below article.

SQL Server Availability Groups in AlwaysOn Configuration

Patching of SQL servers in Availability Group

Check all related articles

Backup 2

How to troubleshoot SQL Server VSS Writer getting failed/Timed Out issue.

As we know, backup is very critical. In many environments, database backups are taken by third-party tools like Avamar, Evault, Netapp, and ComVault. In such cases, many times backup fails due to SQL Server VSS Writer error. You will see errors like Timed Out or Non-retryable error.

SQL VSS Writer Error

To troubleshoot the issue, you can follow below given steps.

  1. To check the ‘Writer status’ you need start the Command Prompt with “Run as Administrator” and execute below command.
VSSadmin List writers

2. You will see number of Writers with their status.

3. Check the status of “SqlServerWriter“. If it shows “Failed“, go to the services. Restart the service “SQL Server VSS Writer”.

4. After that restart the service “Volume Shadow Copy” and then check “SqlServerWriter” status again.

If you are still observing the error, then you need to reinstall the SQL Server Writer. To do that please follow below steps.

  1. Go to “Program and Features” and uninstall “Microsoft VSS Writer for SQL Server”.
SQL Server VSS Writer Name

2. Go to your SQL Server Setup and install SQL Writer using “SqlWriter.msi” file.

3. Now check the Writer state again and you should be capable of seeing it as “Stable”.

Please refer below Microsoft article for further details.

Backup issue because of SQL Server VSS writer

Check all related articles

SQL Server 2

MSDB Database-Usage, Features

MSDB Database is one of the important system database.

The MSDB database serves SQL server Agent by handling jobs. It also supports other features such as Service Broker and Database Mail. SQL Server automatically maintains the history of Backup and Restore within MSDB Tables. It includes information like the name of the user that performed the backup. It also includes the time of the backup. It details the device or path where the backup is stored.

Backup events for all databases are recorded even if they were created with custom application or third party tools.
Because of all these reasons Microsoft always recommends to keep the MSDB files in fault tolerant storage space.
By default, recovery model of this database is set to Simple.

Roles:

MSDB is the only system database that has pre-defined database roles besides the regular fixed roles.

MSDB Database Roles

Below are the database roles and their use.

Group NameDatabase Role NameRemarks
Database MailDatabaseMailUserRoleOnly members of this database role can send mails through SQL Server.
Integration Services Rolesdb_ssisadmin
db_ssisltduser
db_ssisoperator
Only members of this database role can work with SSIS packages.
Data Collectordc_operator
dc_admin
dc_proxy
Used to implement the Data Collector Security.
Policy-Based ManagementPolicyAdministratorRoleOnly members of this database role can manage a SQL Server instance Policies.
Server GroupServerGroupAdministratorRole
ServerGroupReaderRole
Only members of these database roles can administer and use registered server groups.
SQL Server Agent Fixed Database RolesSQLAgentUserRole
SQLAgentReaderRole
SQLAgentOperatorRole
Only members of one of these database roles can use SQL Server Agent.
Multiserver EnvironmentTargetServersRoleUsed to work with a Multiserver Environment.
Server UtilityUtilityCMRReader
UtilityIMRWriter
UtilityIMRReader
Used to work with the Server Utility.
MSDB database roles with their use

Restrictions

We have many restrictions while working with this database. We cannot perform below activities on this database.

  1. We cannot drop MSDB database.
  2. We cannot drop the “Guest” user from this database.
  3. As it is one of the system databases, we cannot enable Change Data Capture (CDC) on this database.
  4. This database cannot participate in the database mirroring solution.
  5. We cannot remove the primary file group, primary data file or log file from the this database.
  6. Renaming of the database or primary file group is not possible for this database.
  7. MSDB database’s default collation is the MSSQL instance collation and cannot be changed.
  8. We cannot take MSDB database offline.
  9. We cannot change the primary file group to READ_ONLY.

Check all related articles

SQL Server 0

Rename The SQL Server

Often during a side by side upgrade, the application team refuses to change the connection string. They want to avoid altering it from the application end. They are unable to point the application to the new SQL server. In such a scenario, they ask you to rename the SQL server with the existing server. This way, when the application comes up, it will connect with the new SQL server without any issue.

Recently I came across the same situation. The application team was not allowing us the side by side upgrade approach. They don’t want to make any changes on the application end. So we provided them the solution. We decided to build the new server first. At the time of final cutover, we will rename the SQL server with the old name.

At the time of final cutover, we rename the SQL server from windows side and started the application. Unfortunately application was not able to connect to the database. Application was throwing error that unable to connect to the database. After investigation we found that only renaming of server is not enough. You need to rename the SQL server from SQL side as well. Yes, you read it correct. You need to alter or update the New name in System Metadata that is stored in “sys. servers” and reported by the system function “@@SERVERNAME” to rename SQL server.

Rename the SQL server:

To change or rename the SQL server, please follow below steps.

  1. If the server hosts the Default instance of SQL Server then, execute below queries.
sp_dropserver <old_name>;
GO
sp_addserver <new_name>, local;
GO

To get these changes effective you need to restart the SQL Services.

2. If the server hosts the Named instance of SQL Server then, execute below queries.

sp_dropserver <old_name\instancename>;
GO
sp_addserver <new_name\instancename>, local;
GO

To get these changes effective you need to restart the SQL Services.

Note: – In Named instance the server name is in format of ServerName\InstanceName. You can change it to NewServerName\InstanceName, but you cannot change it to ServerName\NewInstanceName.

Story don’t end here, sometime even if you execute above queries, it will not work or you will get the error.

In below scenarios you get errors after running above queries.

  1. When Remote logins are present
Error Message:
Server: Msg 15190, Level 16, State 1, Procedure sp_dropserver,
Line 44 There are still remote logins for the server 'SERVER A'

2. When Logins associated with Linked server are present

Error Message:
Server: Msg 15190, Level 16, State 1, Procedure sp_dropserver,
Line 44 There are still remote logins or linked logins for the server 'SERVER A'

Check all related articles

SQL Server 2

Change The SQL Server Name Where Logins Associated With Linked Server Are Present. Or Fix Error : Msg 15190 – There are still remote logins or linked logins for the server

If you go and change the SQL server name wher it has Linked server and logins associated with it. In such cases, if you attempt to drop the old server name for renaming SQL server, then you will get below error.

Server: Msg 15190, Level 16, State 1, Procedure sp_dropserver, Line 44
There are still remote logins or linked logins for the server 'SERVER A'

In this scenario, first you need to find out which are logins associated with Linked server. Below stored procedure will help you to check this.

EXEC sp_helplinkedsrvlogin

In the result of this Stored Procedure you will get the list of logins associated with linked server. Now you need to drop these logins one by one.

To drop these logins, please use below query.

sp_droplinkedsrvlogin 'old_name', 'linked_login';

After successful removal of these logins, you can drop the old server easily. Now go ahead and rename the SQL server. You can perform below steps to do this.

  1. If the server hosts the default instance of SQL Server then, execute below queries.
sp_dropserver <old_name>;
GO
sp_addserver <new_name>, local;
GO

To get these changes effective you need to restart the SQL Services.

2. If the server hosts the named instance of SQL Server then, execute below queries.

sp_dropserver <old_name\instancename>;
GO
sp_addserver <new_name\instancename>, local;
GO

To get these changes effective you need to restart the SQL Services.

Check all related articles

SQL Server 2

Change The SQL Server Name Where Remote Logins Are Present. Or Fix the Error: Msg 15190 – There are still remote logins for the server

If the SQL Server has the Remote Logins, then at the time of changing the SQL Server name you will receive below error.

Server: Msg 15190, Level 16, State 1, Procedure sp_dropserver,
Line 44 There are still remote logins for the server 'SERVER A'

This is because some remote logins are present on the server and they are not allowed to modify the Server name in System metadata. To solve this problem, first you need to drop these remote logins. In order to drop these logins, please follow below procedure.

  1. If the SQL server instance is default instance. Please run below query.
sp_dropremotelogin old_name;
GO

2. If the SQL Server Instance is Named instance, then please run below query.

sp_dropremotelogin old_name\instancename;
Go

After removal of all remote logins you can easily rename the SQL Server using below queries.

  1. If the server hosts the default instance of SQL Server then, execute below queries.
sp_dropserver <old_name>;
GO
sp_addserver <new_name>, local;
GO

To get these changes effective you need to restart the SQL Services.

2. If the server hosts the named instance of SQL Server then, execute below queries.

sp_dropserver <old_name\instancename>;
GO
sp_addserver <new_name\instancename>, local;
GO

To get these changes effective you need to restart the SQL Services.

Check all related articles